Friday, 24 June 2016

♠How to Fix VirtualBox “UUID already exists” Errors♦


If you’re running VirtualBox on a Windows computer, you’ll probably run into errors from time to time. When I migrated my virtual hard drives from one physical disk to another I ran into a permissions error. Apparently when Virtualbox creates a .vhd (or other format virtual hard drive) it bakes in a universally unique identifier that it uses to recognize VHDs. Normally it doesn’t cause problems, but in this case it prevents duplicates or moved virtual disks from running from an unknown location.
The error looks like this:
virtualbox error - failed to open hard disk uuid
“Failed to open the hard disk E:\VirtualBox VMs\Windows 8 \Windows 8 Enterprise2.vhd.
Cannot register the hard disk ‘E:\VirtualBox VMs\Windows 8 \Windows 8 Enterprise2.vhd’ {ca2bdc6a-a487-4e57-9fcd-509d0c31d86d} because a hard disk ‘E:\VirtualBox VMs\Windows 8 Enterprise\Windows 8 Enterprise2.vhd’ with UUID {ca2bdc6a-a487-4e57-9fcd-509d0c31d86d}already exists.
Result Code:
E_INVALIDARG (0x80070057)
Component:
VirtualBox
Interface:
IVirtualBox {3b2f08eb-b810-4715-bee0-bb06b9880ad2}
Callee RC:
VBOX_E_OBJECT_NOT_FOUND (0x80BB0001)”
Oracle has a chapter in the VirtualBox manual that covers UUID problems, which may reveal how to fix this. Or you can just follow the steps below.

How to Reset the UUID

To fix this you’ll need to run some text commands. Open up the Command Prompt. In both Windows 8 and Windows 7 it can be found by typing “cmd” into the Start Menu search box.
launch cmd prompt windows 7windows 8 command prompt
Now change the cmd prompt’s directory to the folder you installed VirtualBox in. If you put it in the default the command is this:
cd C:\Program Files\Oracle\VirtualBox\
cd to the virtualbox directory
Now type in the following command (or copy/paste using right click):
VBOXMANAGE.EXE internalcommands sethduuid “pathtovhdfile”
uuid changed
If everything worked you should see a message saying “UUID change to: …” and then the VirtualBox should work. All fixed!

♦ Mklink command: Create symbolic links in Windows 7 ♠


I frequently use symbolic links on Linux, but I rarely use them on Windows 7. However, creating symlinks in Windows 7 is really easy via mklink. Here’s the syntax and a simple example.
Mklink Command for Symbolic Links
Tip: When using the mklink command, never forget the quotes. Also, deleting the symlinks via the Windows Explorer works, you’re not deleting the actual folder

Mklink Example

MKlink Example
Enter mklink /J "C:\Program Files (x86)\Steam\steamapps\common\audiosurf" "D:\audiosurf"
In this example I create a directory junction in C:\Program Files (x86)\Steam\audiosurf that points to the actual game folder D:\audiosurf

Mklink Command Syntax

MKLINK has 3 options /D, /H and /J. You also need to specify the path to the new symbolic link and the path to the original file or directory.
The Syntax:
/D – used to create symbolic links for directories (d for directory)
/H – used to create hard links (h for hard link)
/J – used to create directory junction (j for junction

What Are Hard Links

Hard links can be defined as “real” links to a file. Windows will treat that link as if it was the original file or directory
Soft links are only shortcuts to a directory, they will not be treated as the real file

What Are Directory Junctions?

A directory junction is basically a hard link (see above) to a directory. We will use this in our example.

When To Use Junction Points vs. Symlinks

Most hard links on Windows will be junction points, but certain programs may only support Symlinks. According to TechNet, symlinks were first introduced for better Linux compatibility (although I fail to see how it is compatible at all). In any case, it is a good idea to first create a junction point and then if that does not work out, create a symlink. Symlinks are also great for relative file links e.g. ..\..\..\..\my-nested-folder

Mklink: Syntax Incorrect

A common mistake of people who are new to creating symlinks is that they forget to add the quotation marks. If you enter a long path and you don’t add the quotation marks to the paths it will output a syntax error, because of the many spaces.
You can either cd to a directory and use relative paths or you can simply add the quotation marks like
mklink /J "path" "path"
If you have any questions how to use mklink or if you need further examples to fully understand it, you may post your request below.

@Configure the RemoteApp Host (Server)@


WORKS ONLY=> Windows 7 Enterprise, Windows 8 Enterprise, Windows Server

Configure the RemoteApp Host

When configuring the host, I’ve been using been using a 1-to-1 setup, I haven’t tested this with pooled virtual desktops yet.
To enable RemoteApp on the host, install the hotfix, then configure the
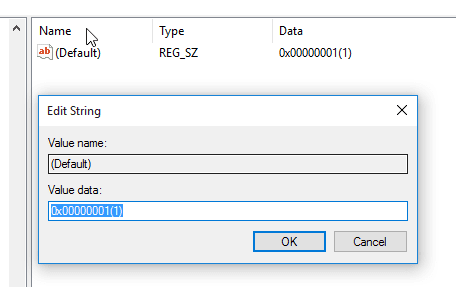
TsAppAllowList key in the registry. In this example, I’ve configured the required entries for running Calculator. Here’s a listing of the registry values I added with the pertinent values highlighted.
1
2
3
4
5
6
7
8
9
10
11
12
13
[HKEY_LOCAL_MACHINE\SOFTWARE\Microsoft\Windows NT\CurrentVersion\Terminal Server\TSAppAllowList]
"fDisabledAllowList"=dword:00000001
[HKEY_LOCAL_MACHINE\SOFTWARE\Microsoft\Windows NT\CurrentVersion\Terminal Server\TSAppAllowList\Applications\calc]
"CommandLineSetting"=dword:00000000
"RequiredCommandLine"=""
"IconIndex"=dword:00000000
"IconPath"="%windir%\\system32\\calc.exe"
"Path"="C:\\Windows\\system32\\calc.exe"
"VPath"="%SYSTEMDRIVE%\\Windows\\system32\\calc.exe"
"ShowInTSWA"=dword:00000001
"Name"="Calculator"
"SecurityDescriptor"=""
The simplest method of discovering the required registry keys for each RemoteApp entry is to configure the applications on Windows XP Mode or Windows Server 2008 running Remote Desktop Services.

Creating RemoteApp Connections

I’ve originally based the .RDP file on those created by the RemoteApp Manager in Windows Server. There is documentation on TechNet on how to configure RemoteApp programs and creating the .RDP file for each application here: Configuring RemoteApp Programs.
The important entries for connecting to Windows XP and Windows Vista, that you may need to add manually, are disableremoteappcapscheck (set to 1) and alternate shell (set to rdpinit.exe). These were the only additional entries I need to add the .RDP file to get this working. DisableRemoteAppCapsCheck fixes the ‘remote computer does not support RemoteApp’ error, and Alternate Shell makes sure you actually get a published application and not a remote desktop.
An .RDP file to connect to a RemoteApp program then looks like this (the added lines are highlighted):
1
2
3
4
5
6
7
8
9
10
11
12
13
14
15
16
17
18
19
20
21
22
23
24
25
26
27
28
29
30
31
32
33
34
35
36
37
38
39
40
41
42
43
44
45
46
47
48
49
50
51
redirectclipboard:i:1
redirectposdevices:i:0
redirectprinters:i:1
redirectcomports:i:1
redirectsmartcards:i:1
devicestoredirect:s:*
drivestoredirect:s:*
redirectdrives:i:1
session bpp:i:32
prompt for credentials on client:i:1
span monitors:i:1
use multimon:i:1
remoteapplicationmode:i:1
server port:i:3389
allow font smoothing:i:1
promptcredentialonce:i:0
authentication level:i:2
full address:s:winxp1.domain.local
remoteapplicationprogram:s:||calc
remoteapplicationname:s:calculator
remoteapplicationcmdline:s:
alternate full address:s:winxp1.domain.local
disableremoteappcapscheck:i:1
alternate shell:s:rdpinit.exe
screen mode id:i:2
winposstr:s:0,3,0,0,800,600
compression:i:1
keyboardhook:i:2
audiocapturemode:i:0
videoplaybackmode:i:1
connection type:i:2
displayconnectionbar:i:1
disable wallpaper:i:1
allow desktop composition:i:0
disable full window drag:i:1
disable menu anims:i:1
disable themes:i:0
disable cursor setting:i:0
bitmapcachepersistenable:i:1
audiomode:i:0
redirectdirectx:i:1
autoreconnection enabled:i:1
prompt for credentials:i:0
negotiate security layer:i:1
remoteapplicationicon:s:
shell working directory:s:
gatewayhostname:s:
gatewayusagemethod:i:4
gatewaycredentialssource:i:4
gatewayprofileusagemethod:i:0
use redirection server name:i:0

RemoteApp in Action

When launching the RemoteApp program, the UI isn’t quite as seamless as you get with the XenApp client. You will first see a warning prompt if the .RDP file is not signed, and then a dialog box while the client connects:

If the RemoteApp host is Windows XP, the user will be required to click the Details button to see the remote login dialog box and enter their credentials:

If the client is Windows XP or above and the host is Windows Vista or above, you can configurecredential pass-through (single sign-on) to make connecting seamless. You must first enable CredSSP on Windows XP SP3 clients. Pass-through won’t work for Windows XP hosts – although you may be able to save the username and password in the .RDP file instead.
So finally with all of the pieces in place, here’s what you’ll see with applications running via RemoteApp. In this screenshot I have Calculator running remotely from Windows XP and Windows Vista next to the local version.
DesktopWithCalculator
One thing to note is that the remote applications are all group together on the taskbar; in this screenshot, the two remote Calculators are grouped with Remote Desktop Connection – users’ won’t see separate remote buttons as you get in competing products.

♠Change the Remote Desktop Connection port to your Windows♠


The instructions below apply to machines under Windows=> xp, 7, 8, 8.1, 10,   Server 2012, 2008 R2, 2008, and 2003. Follow these steps:

  1. Connect to your server via Remote Desktop
  2. Click simultaneously on the Windows logo + R to open the “Run” dialog and execute the “cmd” command
  3. Open the registry editor by typing the “regedit” command
  4.  Search for this registry subkey: HKEY_LOCAL_MACHINE\System\CurrentControlSet\Control\TerminalServer\WinStations\RDP-Tcp\PortNumber
  5. Double-click or right-click on the “PortNumber” registry subkey, select the decimal base and type the port number of your choice (the default port is 3389, in this example, we selected port 3390). Click on “Ok” to save your selection.
  6. IMPORTANT: Make sure that remote access to your server through the new port is authorized in your Windows firewall before executing the next step.
  7. Exit the registry editor
  8. Restart your server
After the reboot, specify the Remote Desktop port number.


Thursday, 16 June 2016

OPERATION COULD NOT BE COMPLETED (ERROR 0X00000709) DOUBLE CHECK THE PRINTER NAME AND MAKE SURE THAT THE PRINTER IS CONNECTED TO THE NETWORK


PROBLEM:

You will get the following error when you are trying to set your printer as default

“Operation could not be completed (error 0x00000709) Double check the printer name and make sure that the printer is connected to the network”


SOLUTION:

Open Registry editor by typing REGEDIT in the RUN Prompt
Traverse to HKEY_CURRENT_USER\Software\Microsoft\Windows NT\CurrentVersion\Windows

Right Click the Windows key and click Permissions…


Select Allow on Full Control permission and click OK


Close the Registry Editor and restart the machine.

♠Windows 10 Edge can’t be opened using the built-in administrator account♣

With the release of Windows 10 today, many are spinning up VMs and loading the new workstation on test boxes to take a look at the final build version.  If you are like me, one of the first things I wanted to test drive was the final release build of the Edge browswer.  Quickly however, I ran into an issue (security feature) out of the box with the built-in administrator account attempting to launch Edge.  I received the error Microsoft Edge can’t be opened using the Built-in Administrator account.  Sign in with a different account and try again.
edge_admin1a

Microsoft has went the direction of making the Edge browser a true app now and additional security is in place much like the Internet Explorer Enhanced Security that we have grown to love and hate.
In order to get around this message in your test environment and be able to use your Built-in Administrator account to navigate Edge, follow the following steps to get up and running.

  • Navigate to your local security policy on your Windows 10 workstation – You can do this by typing secpol.msc at a search/run/command prompt.
  • Under Local Policies/Security Options navigate to “User Account Control Admin Approval Mode for the Built-in Administrator account
  • Set the policy to Enabled
edge_admin1


edge_admin2 


HKEY_LOCAL_MACHINE\SOFTWARE\Microsoft\Windows\CurrentVersion\Policies\System

  • Create a DWORD value if it doesn’t already exist called FilterAdministratorToken
  • Set Value To: 1


Next we need to navigate to the registry and make an additional change:

  • HKEY_LOCAL_MACHINE\SOFTWARE\Microsoft\Windows\CurrentVersion\Policies\System\UIPI\
  • Change the Default string key to 0x00000001(1)

edge_admin3

edge_admin4

     HKEY_LOCAL_MACHINE\SOFTWARE\Microsoft\Windows\CurrentVersion\Policies\System
Over on the right-hand side, you should see a setting for EnableLUA, which you’ll want to customize as follows:

  • Change EnableLUA
  • Set Value To: 1


Create 3TB virtual drive for virtualbox


You can not use the GUI to accomplish this, but you can with the command line like:

vboxmanage createhd --filename 3TB.vdi --size 3000000 --format VDI --variant Standard

how to create fix disk:

Change this

--variant Fixed

☻How to Change Windows 7 Product Key☺


GUI Method

  • Click the Start button , right-click Computer, and then click Properties.
  • Scroll down to the bottom of the window that appears, and then, under Windows activation, click Change product key.
  • If you’re prompted for permission to continue the process, click Continue.
  • Follow the instructions to change your product key and activate your copy of Windows 7.

Command Line Method

  • Click the Start button and run cmd as Administrator.
  • Type following Command


C:\Windows\System32>slmgr.vbs -ipk "INSERT-YOUR-PRODUCT-KEY"
 
example:
C:\Windows\System32>slmgr.vbs -ipk XXXXX-XXXXX-XXXXX-XXXXX-XXXXX 

# Activate Windows
C:\Windows\System32>slmgr.vbs -ato
How to Change Windows 7 Product Key